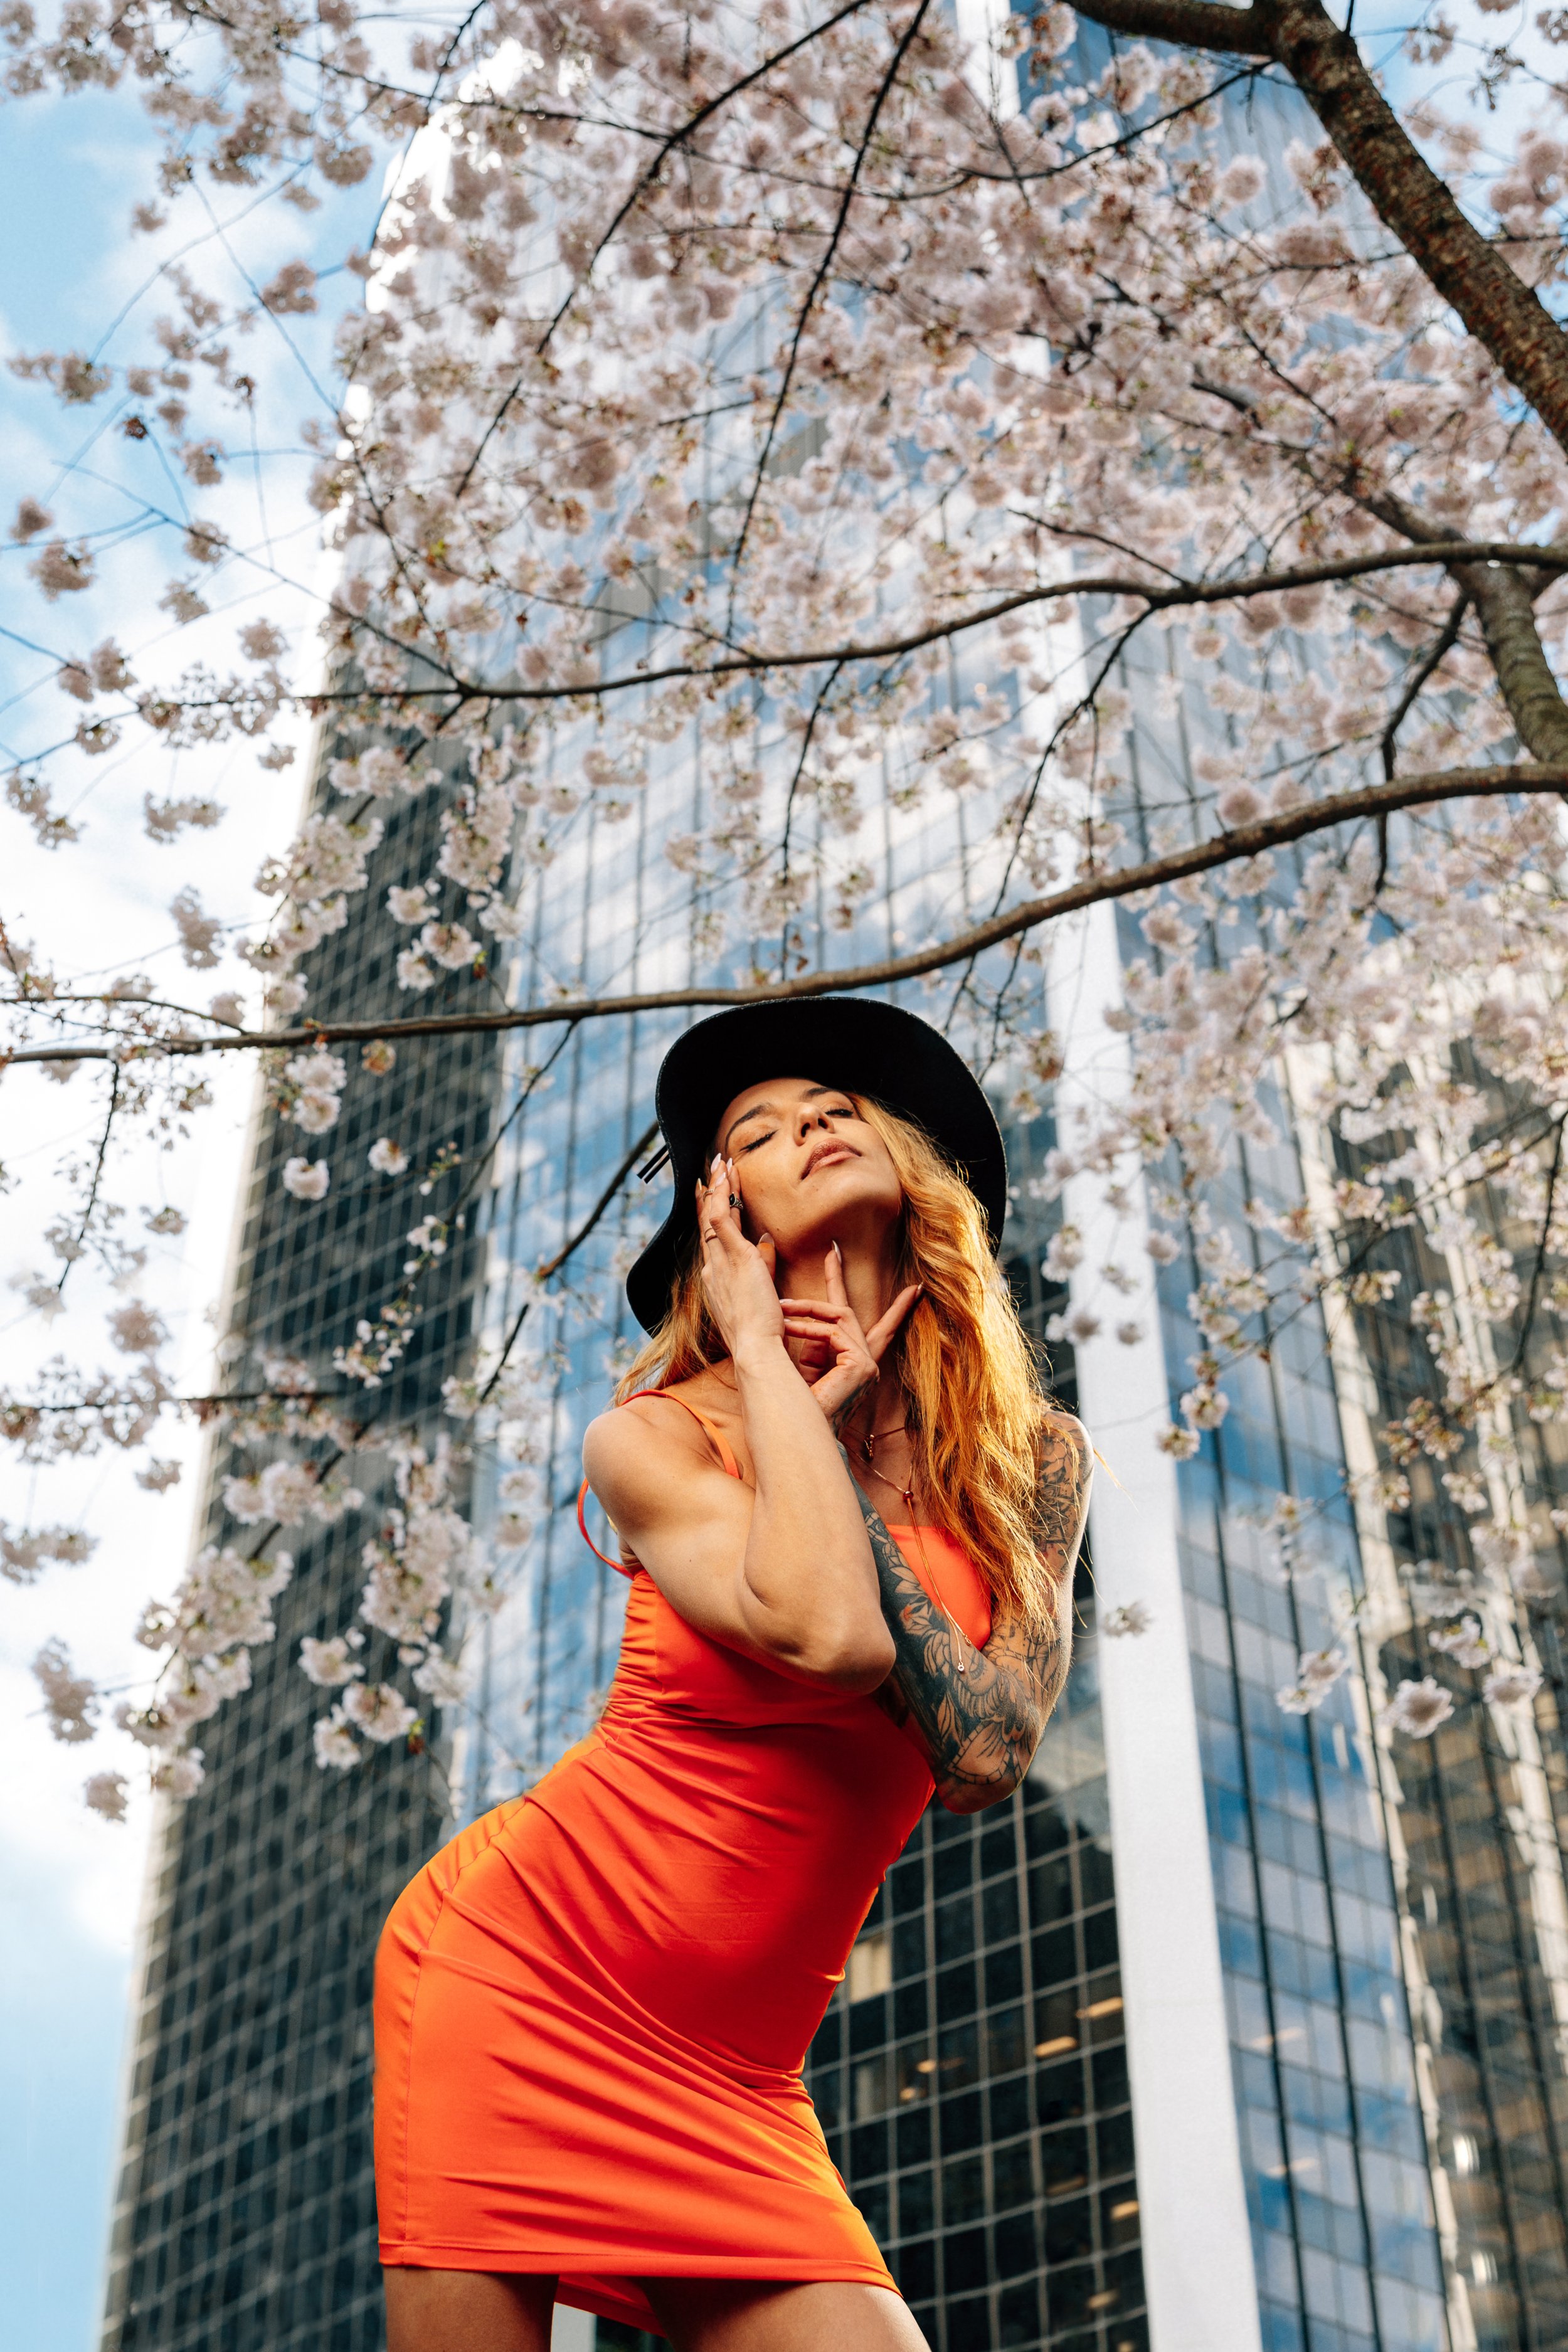
Fashion photograph shot with an external, off-camera softbox flash. (® Ian Kobylanski, Koby Photography)
Contents
i. Introduction
ii. What’s an off-camera softbox flash or strobe
iii. Why use a strobe or flash
iv. The investment
v. Which light modifier to use
vi. How to use an off-camera flash or strobe
vii. Light positioning
viii. Tips, best practices, & troubleshooting
ix. Conclusion
I. Introduction
Incorporating an external, off-camera softbox flash into my professional portrait, fashion, and lifestyle photography is the technique that has made the biggest difference in my photography career and style.
From the services I can offer, the consistency of my shots, the control of variables no matter what the conditions are, and most importantly, the “pop” each photo has made the subject contrast against the background: softbox flashes or strobes are a game changer.
Using an external, off-camera softbox flash or strobe when shooting on-location for street photography – or generally subjects within in landscapes – lets you master the exposure across the foreground, middle, and background (even before post-processing).
For example, you can capture a perfectly exposed sky at a beach with your model and subject perfectly exposed by the flash – without needing to drop your highlights or boost your shadows to match the different exposure levels.
II. What’s an Off-Camera Softbox Flash or Strobe
An off-camera softbox flash or strobe is simply a blast of light from a source that is not affixed to your camera and is softened by a light modifier.
The term flash or strobe is interchangeable, whereas the term strobe is often referred to as a dedicated flash off of the camera that isn’t compatible with sticking it to the hot-shoe on the top.
An off-camera softbox flash or strobe setup consists of four parts:
1. The flash unit
Just about all speedlight flashes (a typical piece of photography equipment, which is a flash that attaches to your camera) can be easily turned into an off-camera flash. I used my Canon 580 EXII Speedlite flash as an off-camera flash for five years before upgrading to a more powerful option. They’re super light and portable.
2. The trigger and receiver
On your camera’s hot shoe (the metal mount on the top of your camera, above the viewfinder), you attach a hot-shoe trigger where one unit sits atop your camera and the receiver to your flash. Canon flashes let you set your flash settings right from your camera’s menu. By keeping your flash on manual, you’re able to control the amount of light and therefore the exposure the flash brings to your subject.
3. The modifier
The softbox part is a light modifier and is what turns the harsh light from your strobe into something super soft and flattering for your subjects.
4. The light stand
A light stand holds everything together and gives you a ready-to-use kit for any kind of subject photography. That said, a good light stand is what protects all of the above from the elements. Light stands will easily blow over: get a good, solid heavy one or be prepared with weights.
Make sure you get a mount for your light stand that fits your speedlight along with your softbox! Many softbox kits come with a mount, but if you’re just purchasing an umbrella softbox you’ll need something for the umbrella to stick into.

Behind the scenes of my one light set up used for many of the images detailed in this article. Shot with a Canon R5 and a Canon EF 24-70mm f/2.8 lens.
III. Why use a strobe or flash
While only my subjective opinion, manipulating light is a core area that separates amateur photographers from professional photographers. Specifically, photographers who focus on shooting portraits, professional headshots for business or acting, fashion, lifestyle, and engagements or couples: everything people-based with subjects. You are able to deliver a consistent image (if you’re a photography business owner, you can charge more for them), leave fewer variables to chance with conditions, and enables you to shoot a much higher quality image (often with lower ISO) than with natural light alone.
It is important to note that, historically, the majority of the best photographs in the world (and many of mine) were taken only with natural light. Flashes and strobes are by no means necessary to be a professional photographer or to charge clients like a professional. However, your ability to control variables, perfect exposures, provide flattering detail, and not settle for what the natural conditions are (especially when you’re scheduled for a paid shoot with an important client and need to shoot at that time) enables you to build a consistent, scalable photography business while creating an area to add your own style.
You become a light artist, rather than a light observer.
Manipulating light in this context doesn’t necessarily mean diving two feet first into flashes and strobes. If you haven’t already, start with a friend holding a reflector. This is the best way to see the impact changing the light can make (and is the cheapest or most accessible). Simply bounce the light onto the shadowed side of your subject (I find myself using the soft, white side of the reflector most of the time).
There are not many ways misusing a reflector can ruin a photo – unless it’s in the frame or it’s the wrong colour of reflected light; however, not knowing how to properly execute a flash can make your shots unsalvageable. This is certainly something I’ve experienced many times with flashes in my career, but mastering the rules of thumb for using flash in your fashion, lifestyle, or portrait photography will separate your photos from all the other photographers who only rely on the unpredictable natural elements.
I’ll stress here that natural light photos are beautiful. Shadows that naturally occur on the subject’s face can enhance the photos and not always detract. Because of the mental learning curve flashes can have, many photographers steer clear of off-camera strobes or flashes their entire career – but simply taking a risk and trying it will separate you from the pack. Just about every fashion, lifestyle, and portrait photo on my website have used an external, off-camera softbox flash.
The only reason I fell into flash photography was because of a time when I assisted for one of my only professional photographer friends in my first year of starting my photography business. My role was to hold his softbox flash from tipping over in the wind. I hadn’t worked with one of these away from a pre-set-up studio. We shot past golden hour and into the darkness capturing beautiful engagement photos with a sky full of stars. I saw how to capture shots that wouldn’t be possible without a cleverly arranged flash and delivered a quality unmatched by natural light for that time of day.
Not everyone has first-hand experiences like these to illustrate the power of flashes. This is why I am writing this article for all the other photographers out there who are looking to differentiate their portrait, lifestyle, and fashion photography work, create a scalable photography business that isn’t dependent on peak shooting times and favourable conditions, and offer a high-quality photography product you can charge more for and feel confident and in control while shooting.

Alleyway portrait at night of R&B singer Babylung. Captured with two strobes: one red flash and one white flash. (® Ian Kobylanski, Koby Photography)
IV. The Investment
I’m an advocate for off-camera softbox flashes and strobes because they can be one of the cheapest additions to your photography gear arsenal that will make the most significant impact.
Generally, the more expensive the photography gear the more variables you’re able to eliminate. This is especially true for camera bodies and lenses. For example, my Canon R5 lets me automatically focus on the eyes of people without using the joystick to find the focus point: not a mandatory element of capturing a professional photo, but this has dramatically decreased my number of out-of-focus shots.
On the other hand, when it comes to lighting and flashes, because clean white light from flashes are often ubiquitous and binary (meaning it either works or it doesn’t, versus a scale of quality for glass in lenses, for example), you can make a powerful off-camera softbox flash set up for cheap. The only drawbacks will be your recycle time (the amount of time between each flash, which limits the number of consecutive shots you can take), battery life, high-speed sync (the ability to shoot faster than 1/200s shutter speed for most cameras with a flash), and consistency (while using cheap gear, I ended up replacing them multiple times over and relied on backups).
Below are two different Canon off-camera flash setups. The first here I used for five years of all types of professional people-based photography including portraits, lifestyle, fashion, and engagements and weddings (when I still offered those services).
The inexpensive, entry-level setup:
There are many better, newer flashes than this one from Canon (I’ve since upgraded as well); however, the Canon 580 EXII flashes are plentiful and easy to find used for cheap – same goes for the Nikon equivalents.
I stuck with these because I could buy many of them to use in harmony with each other (just grab more sets of receivers). I’d stick two together with a dual flash bracket and have others as backups. Having multiple speedlights synchronized together off-camera is great for product photography.
These speedlights and most other camera manufacturers’ models take AA batteries, but buying packs of rechargeable AA batteries is an easy workaround.
However, Godox is one of the most popular brands for those breaking into flash photography for the first time. I’ve had many friends have success with the Godox V860III. Both this and the Canon 580 EXII are versatile, do-it-all flashes for capturing flash shots on your camera and off. You’ll need a Godox receiver if you’re going Godox’s direction. I personally upgraded to the Westcott FJ80 speedlight as detailed below.Yongnuo YN-662C Wireless Trigger and Receiver (for Canon) (click here for Nikon)
Neweer 5-in-1 Collapsible 110cm Reflector (every photographer should own one of these!)
Bonus addition to reduce recycle time (take full-power speedlight shots faster):AODELAN External Flash Battery Power Bank
An external battery bank that attaches to your camera brand’s flash enables your flash to pull more power from the bank than just the AA batteries inside of them. This enabled for my Canon 580 EXII to recharge a full-power flash in one second or less, versus four or six seconds with just AA batteries on their own. Four to six seconds is a LONG time to wait when working with a client or a model. Try out one of these battery packs
This second setup below is what I use today when I upgraded in January 2022 as my lifestyle and fashion shoots along with my clientele became more serious. I couldn’t afford for my flashes to get finicky in shoots. Frankly, this would happen a percentage of the time with speedlight setups and I’d panic trying to troubleshoot in front of clients.
That said, my whole upgraded setup below is still cheaper than the average professional lens. For the more experienced flash photographers reading this article, there are certainly much, much more advanced units you can purchase. I’ve chosen these items because I always shoot on location – especially in outdoor settings and on the street. I’ve found this to be the most portable, the best value, and they all work in harmony.

Fashion photograph captured with one external softbox flash strobe. (® Ian Kobylanski, Koby Photography)
The advanced setup:

Fashion photograph captured without the use of any flash or strobe. (® Ian Kobylanski, Koby Photography)
Westcott Rapid Box Switch Octa-L Softbox (or often swapped with the Octa-M)
Threaded Affixing Light Stand Weight (I find these much more convenient than sandbags – although they’re often sold out everywhere)
Neweer Portable Pop Up Changing Booth (I put this here because I wish I knew these existed YEARS ago! They are amazing for outdoor or indoor onsite shoots and for not relying on public bathrooms)
My backup setup (or used in combination with my main light):Diffusion Dome for FJ80 (if I’m packing super light with no softbox)
Westcott FJ80 Magnetic Grid Gel Pack (for creative shoots. The FJ400 comes with some of these included but not the FJ80)
I’ve loved the Westcott lights this year because of how user-friendly they are and how well all the products work together. Their receivers are universal for any camera model too. However, the integer system (1.0 through 9.0) for setting the light power I’ve never really loved. This is similar to the Profoto systems, but at times I found the fractional systems (1/1 through 1/128 etc.) of the Canon units (and Godox, which is the most popular flash producer) easier to wrap my head around sometimes. I find myself guessing and checking more when setting up; however, the integers are easy to dial in and make really fine changes once you’re initially set up.
I’ve had nothing but great things to say about Westcott. Unlike Godox, they have amazing customer support who you can reach out to at any time. They’re an underdog in the space and I recommend checking out!
V. Which light modifier to use
There are four factors to consider when picking out a light modifier:
1. Light size
The bigger the light source the softer the light. Larger reflectors mean softer light and often less shadows on a subject’s face. Softer doesn’t always necessarily mean better depending on your artistic direction (sometimes more hard or masculine looks demand brighter highlights and harder shadows).
I’ve always gone for the largest softbox I can muster on location. If I need the flash’s light to be harder, it gives me the flexibility to simply move my flash backward and give myself more space. Trying to get the softest light from a small softbox means being limited to keeping it close.
A 48” octagonal umbrella softbox was my go-to for five years using my speedlight off-camera as a strobe– albeit breaking five of those umbrellas during that period because the wind would throw them to the ground (never learnt my lesson). I began making an effort to bring light stand weights. If you don’t have these, threading your backpack’s carry handle through the shaft of your light stand (below your flash unit) can make for an easy weight.
I’ve now settled for the 36” softbox with my Westcott FJ400 and spent more on the softbox upfront to avoid buying more replacements. My 48” I use in indoor settings when I have the most control of environmental variables.
2. Light shape
The light shape impacts the catch-light reflecting in your subject’s eye. Whatever the shape is of your light, you’ll see it in the eye of a subject. Something boxier might appear like a window. Narrow rectangle strip softboxes are great at lighting your subject’s whole body and make for an interesting catch light when combined with other lights.

Studio portrait photography captured with two lights (one Rembrandt light and one hair light). (® Ian Kobylanski, Koby Photography)
I opt for more circular ones, going for octagonal softboxes. They’re round enough to compose well against an eye’s already circular shape but super collapsible and portable. You can get far rounder ones like parabolic softboxes but aren’t as easy to take down.
3. Light softness (or intensity)
Diffusers soften the light by filtering it down with white nylon fabric (often layers of it), by bouncing it off a reflective surface (like the inside of a flash umbrella), or by a combination of them both.
Umbrella softboxes that bounce your flash’s light off of the back reflective interior create some of the softest light when it has its front white nylon covering (and one of the cheapest options). However, these set ups – especially big softboxes – demand a LOT of light.
Shoot-through softboxes are when light directly shoots through the diffuser versus bouncing off the back. These ones often have multiple layers of fabric diffusion. These are what I use today and allow me to take advantage of all my light’s power when needed – especially when trying to beat the sun.
4. Light spread
Lastly, light spread it something to consider when shooting indoors, in a studio, or on a background or wall. Naturally, your softbox will throw light in every direction. This means your light will spill onto the wall behind your subject and light part of the wall – but not all of it. If shot wide, this may create a spotlight effect and appear obvious that an off-camera flash was used.
You may consider adding a honeycomb grid to your softbox as this makes the light only travel in a straight path from the diffuser. This is good for narrowing down your light so it’s only on your subject (or one part of your subject) but not everywhere else.
TIP: Use light spread to your advantage. This is also called “feathering” your subject. When you feather, you are using the light that would otherwise spill past your subject (the periphery of your flash) to instead light your subject. Your flash is only giving a glancing blow to your model. Put yourself in your model’s shoes, and turn the light so that your eyes can only see about 20% of the white of the front of your softbox (use your discretion).
This lets you create softer light, and more unique shadows, but also as a key way to avoid getting softbox reflections in the glass behind your subject if using a window view as a backdrop!


VI. How to use an off-camera flash or strobe
Using an off-camera flash can appear complicated on the outside. I overthought it for far too long in my career and found myself always going back to the YouTube videos to correct my mistakes. I kept messaging up because I kept forgetting the fundamentals. It is a truly straightforward, simple process to get a perfectly exposed photo with a fill flash. To emphasize this point, I’ve kept this section as direct and straightforward as possible.
1. Take test photos to measure ambient light (with no flash or receiver attached to your camera)
This is to measure ambient light, which is the light naturally occurring in your shooting environment. Put your camera on manual, ensure no receiver or anything else is on your camera yet, and expose your shot for the background. Get the background – be it the sky, buildings, streets, forest, or ocean – the exact exposure you want. Don’t worry if your subject is too dark.
i. Check that your depth of field (how in focus or blurred your background is) is what you want to achieve.
ii. Keep your ISO as low as possible.
Weaker flashes might require you to increase your ISO because one low-level speedlight may not be enough to beat out the sun. On a sunny day at the beach, you may need brighter highlights in your sky when using a starter flash to ensure your subject isn’t too dark when your flash is on full power – or if you need your flash recycle time to be shorter.
iii. Lock in your aperture and ISO.
We lock aperture and ISO because we want to limit our variables while shooting. By locking these two, the only variables that remain are our shutter speed and our flash power.
Shutter speed brightens or darkens your background.
Flash power brightens or darkens your subject.
You’ll only need to worry about those two things throughout your shoot. If the sky gets darker, lower your shutter speed. If the same goes for your subject, increase your flash power.
TIP: If your flash has high-speed sync, you can increase your shutter speed past 1/200s to give room for you to adjust down as ambient light changes later on in the shoot – without going back and increasing ISO or widening aperture. In other words, creating buffer room for decreasing your shutter speed as it gets darker outside (to brighten up your background).
High-speed sync works by making your flash blast multiple times in one frame – faster than the eye can see – to enable you to work with a faster shutter speed. Otherwise, your shutter beats the flash when exceeding 1/200s shutter speed and you’ll see black bars on your image.
2. Check your gear and settings
Double-check these again before you start shooting. You don’t want to overwhelm yourself with different variables that might have to be changed.
Ensure your camera is on Manual mode to adjust all these settings. Especially make sure your flash is on manual mode; if you use the TTL (through the lens) setting, your flash will try and get guess the right amount of light to use – but it won’t consider the diffusers that you’re using. Keep it on manual so you know what to expect for each shot.
Then, make sure your high-speed sync is on (it should often turn on automatically when exceeding 1/200s shutter speed on compatible flashes).
Is each of your batteries charged? Before getting lost in your camera settings, make sure EVERY piece of gear works before shooting and TEST them before you leave the house. Take control of all your variables.
3. Adjust your flash power to get the right exposure for your subject
Start with your flash on the highest power and work down from there. Need to adjust how dark or bright the background is? Adjust the shutter speed. At this stage, you’re only minding your flash power, shutter speed, and the composition of your photo. Use the Venn diagram below for reference.

4. Fire away! Be mindful of your recycling time
Limiting your variables lets you relax and focus your conversation on the subject, make them comfortable, and hone in on your composition. Keep an eye out for shots you’re taking while the flash is recharging for the next one – if you find yourself waiting, consider adding a battery pack to your speedlight or seeking out a flash unit with a higher wattage.

Photograph on the left was captured with a strobe flash; photograph on the right was captured without. (® Ian Kobylanski, Koby Photography)
VII. Light positioning
Whenever shooting outdoors, I almost always shoot with just one light. This is because I only use my flash as a fill light (or “fill flash”). The technique of using a fill flash simply means using light to fill in the shadowed areas left by the sun. This balances both ambient light and artificial light for a far more realistic and natural-looking picture while still holding perfect exposure.
If you’ve used a reflector before, the best way to imagine setting up for a fill flash is that your light will be facing the direction your reflector would: directly opposite of the sun. This is so the flash’s light is targeted at balancing both ambient and artificial light by filling in the shadow areas caused by the sun.
For shooting as a fill flash – or with any type of external softbox flash set-ups – I aim towards shooting with Rembrandt light positioning. I’ll position the light so it is facing the most exposed (or visible) cheek of the subject to the camera when they’re positioned at an angle.
Rembrandt Lighting
Rembrandt lighting (popularized by the Dutch painter Rembrandt) simply has the light placed at 45º from where you and the subject are standing.
In other words, the light is just to the right – or left – of where you’re shooting; where you, the light, and your subject are making an equal-sided triangle. The light is (often) tilted at a 45º angle facing your subject as well.
When incorporating ambient light with a Rembrandt-positioned flash, I set my camera to fill the shadowed areas on my subject that cast by the flash with ambient light exposure. Decreasing your shutter speed can help lighten those areas if you’re having trouble.
This helps create one of the most natural-looking light setups when combined with ambient light. This is what “fill flash” shooting is defined as. The untrained person viewing the photo may not even realize a big softbox flash or strobe was used to create the image.

An example of Rembrandt lighting in fashion photography using one strobe and exposing for ambient light fill. (® Ian Kobylanski, Koby Photography)
Butterfly Lighting

An example of butterfly lighting in headshot photography captured with one strobe. (® Ian Kobylanski, Koby Photography)
Butterfly lighting is popular with corporate, commercial, and acting headshot photographers. This lets you create a near-shadowless face (if your light source is big and close enough) and is easy to create a consistent image, popular in business photography. Plus, you can create a super professional look with a single light.
Butterfly Lighting has the light placed directly above where the camera is shooting, tilted (often) at a <45º angle facing the subject.
Visualize your setup as if your off-camera flash was actually on top of your camera, but jacked high up on a light stand and pointed down. Some studio photographers might use a boom arm to hold this light so they can stand underneath it without getting blocked by the pole.
Pair this position with a reflector placed flat on the ground (white side up) or raised flat on a reflector stand. This will bounce your flash under the chin of your subject and will naturally remove under-chin shadows caused by your flash (I use this for Rembrandt as well)
Two core rules of thumb that are helpful to remember:
1. The closer your light is to the subject, the softer the light will be.
2. The larger your light source, the softer the light will be.
Both of these are important in butterfly lighting; if you can’t get your light super close to the subject, get a bigger softbox to compensate (or vice versa).

An example of butterfly lighting in headshot photography captured with one strobe. (® Ian Kobylanski, Koby Photography)
I find my light pole gets in the way when using this lighting set up on location and bringing a boom arm is cumbersome to set up and transport. This is why I opt for Rembrandt (light placed at a 45º angle) as it feels more natural – and lets me get the flash closer to the subject for a softer light with even fewer shadows when desired. I’ll let the ambient light fill the shadows or combine the next technique “hair lighting” below.
Hair (or Background) Light
When shooting in an indoor setting like the majority of my onsite commercial or corporate headshot photography clients, I pair my Rembrandt positioned light with a “hair light”.
A hair light is an accompanying (second) light to your setup. It’s positioned to the back left or back right of your subject (out of the frame). It is not often meant to be the only light lighting your subject. It gives your subject contrast against the background and can add a subtle amount of light to your subject’s silhouette.
When shooting with two lights and setting up, adjust your flash power with only one light at a time. Get your main light (or “key light”) set to the right power first, then turn it off, and proceed with the same for your second. This gives you a sense of what each light is doing for your photo and applies to any number of additional lights being added to your lighting composition.
To illustrate a hair light, imagine your subject is the centre of a clock. Where you’re shooting from is 12 o’clock. If you’re shooting with butterfly lighting, your butterfly light is with you at 12 o’clock too. If you’re shooting with Rembrandt lighting, your light is either at their 1:30 or 10:30.

Studio portrait photography captured with one Rembrandt positioned strobe and a window providing ambient light. (® Ian Kobylanski, Koby Photography)
Your hair light is going to be exactly opposite your key light. This means either 4:30 or 7:30 on the clock for Rembrandt. This will let your second light fill in any of the shadows left by your key light. Follow the tip below for butterfly lighting to avoid getting your flash visible in the shot
TIP: If you want to avoid casting any angled or distracting shadows when shooting up against a wall or a backdrop (or for butterfly lighting), put your second light at 6 o’clock (behind the subject).
Take off the softbox, tilt the light facing directly up, and lower it so it is hidden behind your subject and below the bottom of your frame (usually at the subject’s waist if taking a headshot). This light will bounce symmetrically off the wall or backdrop behind the subject and negate any of the shadows from your key light.
I use hair lighting (or often any second light) when I’m indoors because one, there are fewer elements and other variables to worry about, and two, shooting indoors often means I have less nice-looking ambient light to use. A hair light (or any positioned second light) will add more light to a poorly lit space and give you more to work with. It can also limit the number of shadows cast onto a wall or backdrop behind your subject.
If there’s nice window lighting, I’ll often use that as my ambient fill light and refrain from using the second light – still keeping a white reflector beneath the chin of the subject to cast up any and all nice light.
TIP: If you’re getting reflections in your subject’s glasses, just raise your flash up higher and tilt the flash on a sharper angle
Under Chin Reflector
To bring any and all of the elements you’re using together, put a reflector flat on the ground or raise it flat against your subject’s waist with a reflector stand. This bounces all your light to mitigate any shadows cast under their chain, flatters their jawline, and helps avoid any other faint shadows on their face. Experiment with either the silver side or the white side for what suits your preference!
IMPORTANT TIP: Bouncing the flash instead of using softboxes
I’ve come back in 2023 to add this section here. When in a room with white walls and a low ceiling, ditch the umbrellas and face your flashes against the wall. This uses the walls as a giant diffuser, making an even softer and even lighting than an umbrella can. This is a technique I’ve been using in 2023 more frequently when capturing commercial lifestyle photos. This enables you to move the subject around a room and capture multiple angles without needing to reposition your softboxes each time. This also means you can travel with less gear.
I typically use two flashes which ensures an even light across both sides of the subject’s face (one flash bounced off either wall facing each other). The more you master your gear, you’ll find the less you'll often use. Try this technique when in a situation where you’re moving all around the room (you can even achieve this with a speedlight flash atop your camera – just point it to the ceiling or wall behind you).

Alleyway portrait at night of R&B singer Babylung. Captured with two strobes: one red flash and one white flash. (® Ian Kobylanski, Koby Photography)
VIII. Tips, Best Practices, and Troubleshooting
• Getting softbox reflection in someone’s glasses? Crank your light higher, and tilt your softbox on a sharper angle.
• Getting softbox reflection in the glass behind your subject when using a window view as a background? Feather your subject with the softbox by only letting a glancing blow of light hit them. Use a reflector to bounce the wasted light back onto their face (get a friend to hold it or invest in a reflector stand).
ª Slow down! Remember: shutter speed adjusts ambient light (background), flash power adjusts your subject’s lighting. If your shutter speed is getting too low, go back and widen your aperture or increase your ISO.
• Is your subject too dark still but your flash is on full power? Or is your recycle time too long in between each shot? Go back and widen your aperture or increase your ISO.
• Don’t abandon your reflector! Use them to capture that wasted light. The easiest thing is to simply place it flat on the ground and let it bounce up to the unreached parts under people’s chins.
• Get a collapsible wagon! For too long I just simply just made a billion trips from my car to the shoot location grabbing all my light poles and gear. I went from bare hands to a collapsible crate with a collapsible dolly (which would frequently tip over), to now a collapsible wagon where that same collapsible crate fits nicely.
Pick one up from a local outdoor store as these are more expensive to buy online than in person. The collapsible wagons are awesome because they are free-standing and won’t tip, they can double as a table (for you to balance things on, swap lenses, etc.), and the handles make it easy to bring it up and down stairs.
TIP: Take your new lighting set up out at night. You can now shoot where your camera couldn’t before. Take your softbox anywhere: light up a cool alley, get neon signs in the background with a perfectly lit subject. With a softbox, you’ve now unlocked no limit to shooting spots when the sun goes down.
IX. Conclusion
Now that you’re set-up, go out and practice! Shoot with your friends who won’t mind if you take time diving into your settings or taking endless test shots. The only way I’ve become confident in my external, off-camera softbox flash is because I’ve screwed up enough times to know what not to do next time. Learn from my mistakes so you don’t have to have them. Don’t rush your test photos, let the light do the work, and become a light artist – rather than a light observer.
Once you build confidence in the flash, leave it at home sometimes for your creative shoots. It is important to make time for shoots and see the impact natural light can make. I found myself so lost in flash photography that I wouldn’t shoot without my strobe
If you’ve found any of these words impactful to your photography: be it your photography business and the services you provide, your interest in photography and what will inspire your style direction next, or helping solve a problem or improve upon a plateau in capturing the perfect image; I invite you to follow me on Instagram, check out some of my other photographer resource blogs below.
Lastly, I just launched my YouTube channel. I welcome you to subscribe for POV photography videos with many techniques in action. Your support is more than appreciated!